Here I am going to review the 3 combo move that I have had utilized to solve the 5x5 Rubik's / professor's cube.
No algorithms or series code to memorize. Simple picture & arrows! That's how I like it. Keep Grey matter use to the minimum.
Understand how to use & then understand how execute it. I want to introduce my visualization to help beginners.
TRIPLE EXCHANGE aka XXX
Why XXX? You got really a lot of whole simpler solutions... but it will require a different algorithm for edge center piece & corner center piece. Answer: this one solves both edge & corner center pieces plus will be used to solve our parity, if any. XXX is relevant at both Step 3 & Step 4.
You can find may other algorithms like l' F l' U' r U l U' r' U F' l for cycling between 3 edge center pieces, and r U2 r U2 r U2 r U2 r for swapping between two edge center pieces. It is faster, but I want to keep as little algorithm as possible.
For details, look into my "Step 3" tab. Here I'll just do bit discussion.
Move is really simple, pick a coordinate, make sure you always execute at this same location a standard series. In actual fact, you can use any two perpendicular directions, & then you repeat it back move in the opposite direction. As long you always use the same.
What changes is which faces that get involve in the XXX and also whether the piece move clockwise or counter clockwise. For my example, I typically use down & left... so to repeat in opposite direction, next step would be up & right. Face involve is top & left, and travel direction counter clockwise.
Your's could be right, then up. So your repeat in opposite direction is left, then down. Your XXX will involve the adjacent plane on your left, & bottom. Direction of your XXX movement is counter clockwise.
Main thing you need to remember when using XXX is that it must be run in 3's. Otherwise your back or hidden planes will be screwed up. I have explained in detail about doing re-run process to correct the other hidden faces, side effect from the XXX. However I did not explain why. You figured?
When you relocate using XXX say 2 pieces off Nami & then back again, you have had 4 runs XXX. But the XXX must be in 3's REMEMBER? Another re-run will give you 8 runs XXX. Your hidden sides still screwed up. Another re-run however gives you a total 12 runs XXX, & now you notice your hidden planes have all return to its initial position,.. PLUS you have corrected 2 pieces on Nami.
In some cases you reliaze you are left with 2 pieces out of order. In Step 3, you can ZIP & SWITCH to alter the corner center pieces. Why? because we do NOT bother about edge center piece yet.
In Step 4, however, if you are met with 2 piece out of order. Means you got unlucky. You have a parity.
You need to split the disorder into two planes. In my example at Step 4, Nami pieces are forcefully corrected, leaving a piece in Robin & a piece in Luffy in disorder.
Solve the parity by introducing a 90 degrees offset into the problem layer; it is just a single flick to left or right. Solve other two layer (not luffy or robin) layer that went out of place using ZIP & SWITCH method. Now you can re-apply XXX to solve for luffy & robin.
The Edge Piece Series
The Edge Piece Series, is another simple move to swap & orient between 3 edges. This move is very flexible once you know how to use it, BUT is will cause haywire to your corner pieces. Therefore, you must solve all edge pieces before touching your corner pieces!
Here I am using a 3x3 rubik with same One Piece pictures to illustrate this method more clearly. First let understand what this combo move will do. Picture below summarizes

The edge pieces that will be involve is circled red & green. All these 3 edge piece will move clockwise replacing one another. A special effect happens at green location. The piece entering the green circle will get FLIPPED or INVERTED!
Now let's go through the moves. A simple 1234 as shown below.
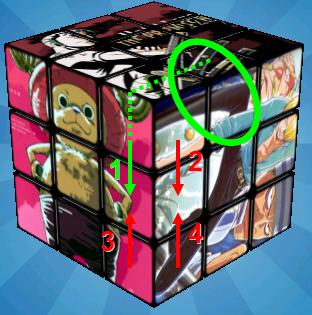
You DO NOT have to memorize. Understand this logic. From picture above I drew the green circle coordinate which an edge entering here will be flipped & some dotted lines to the number 1 move arrow. This is to help your execution!
1. Lock you eyes on the location where you want inversion to happen.. my circled green in this case.
2. Ask which way you to go? clockwise or counter? Here we want counter clockwise; Sanji/Zoro edge to go down.
3. So imagine from dotted green lines you are pulling down Sanji/Zoro down. That will hint your number 1 move.
4. Number 2 move is rotating opposite plane also downwards; chopper's plane.
5. Then repeat same move in opposite direction. Reverse you number 1 & 2 move, using up rotation.

This cube above is what you will get after the edge piece series. You really got to know what you want to happen.
Specify where you want a piece to go. Determine it needs to be Inverted or Flip. If it does, mark that spot as "green" & execute accordingly. If it doesn't mark "green" else where.
In a 5x5, this combo will help you through step 5 & step 6. The only difference in a 5x5, instead of single edge, 3 edges will move as whole.
The Corner Piece Series
This is the most commonly used series in 3x3 Rubik cube solution. Still I am explaining in my way of visualizing it. Again I am using a 3x3 so that you see clearer. No difference in 5x5, same 8 corners.
First you got to understand how to visualize it. How it will happen. Remember, corner pieces must be position proper & permutation correctly too. If a corner piece is already in position, you just need to make sure one side fits properly, the other must also be correct.
Cube below is just need a single corner piece series to solve. The mark Green corner piece belong on other opposite side across with chopper's hat on top. The side with chopper hat's (shown by green box) edge will need to come up on top when it travels across. Similar for red & blue, box & arrow show where the corner pieces need to go & orient correctly.

- How I imagine it all going to happen is that the green face (with a piece of Chopper's hat) is like a window, I want to throw a ball across (shown by the green arrow), so my window must face where I am going to throw the ball right?
- Now on the blue corner, I also going to throw balls. I have to used the blue face on top side (piece of chopper pants) as window because I do not want to throw back the ball from where it came from!
- From blue window, I can choose to throw either to bottom left or bottom right corner. In this case, we want it go right.
- Red window similar thing happens. It must face properly (in this case bottom side hidden) to throw ball back to the green.
Now that you know where to setup your window & direction of your ball throw, it is matter of execution. In picture below, I mark direction of travel red, green, & blue.
- Find where pieces travel on side edges. Here it is the Red & Green.
- Imagine you need to pull opposite of Green line to the Red line. Thus, your 1st move in down (chopper clockwise rotation)
- 2nd move imagine push that bottom corner behind
- then rotate back chopper plane & then push the top corner behind.

Next we put back the corners we pushed behind as shown below. Clockwise chopper's face, shift back to front bottom corner, counter clockwise chopper's face, shift back to front upper corner.

You are done! How to use this? it at my last tab
